Tuesday, September 30, 2014

Spicy Whole Roasted Cauliflower

Recipe: Spicy Whole Roasted Cauliflower
Source: Ask Dr. Nandi
Time: 55 minutes (15 min prep, 40 minutes cooking)
Ease: 2
Taste: 1
Leftover Value: Was not worth saving
Down the Drain or Keep in the Strainer: Down the Drain!

I should have known better than to get my hopes up with a recipe on Facebook.  The one pot pasta should have taught me that.*

But I couldn't restrain myself.  It looked so good.  It looked so different.

It's looks were deceiving.

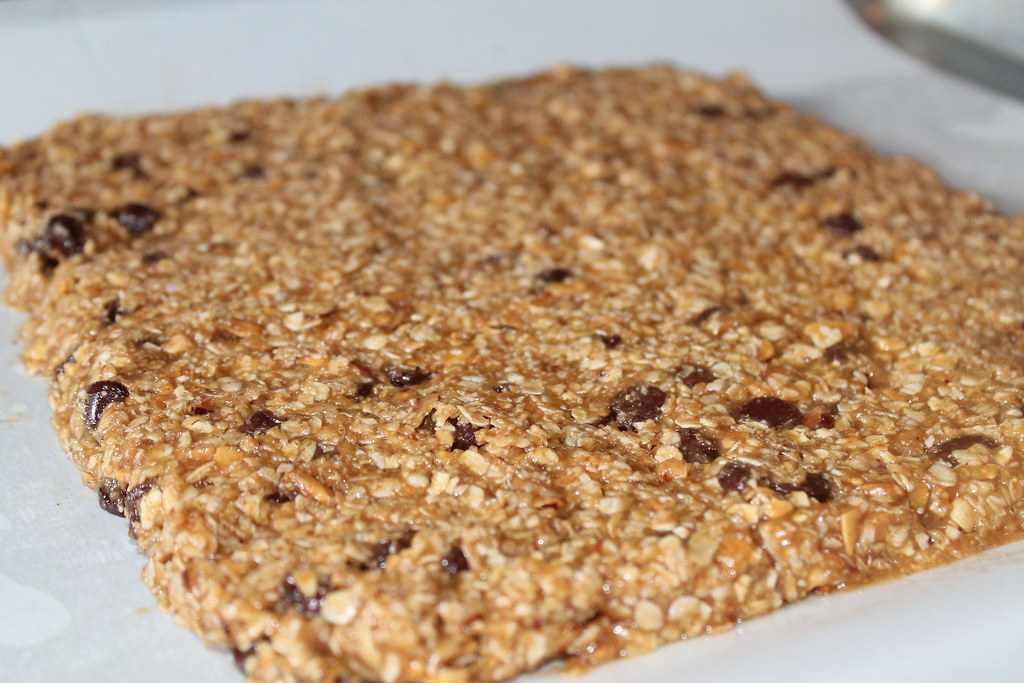
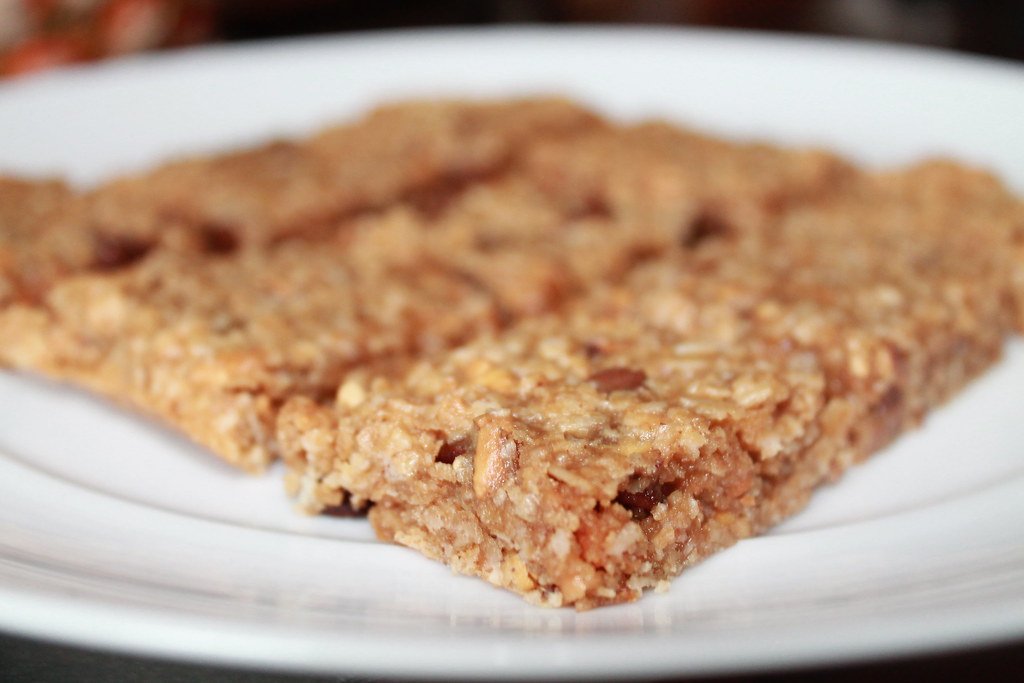
*I'm not totally knocking the one pot pasta.  It's a great concept and simplifies the whole process of pasta.  The only issue was it was a little bland (my issue) and lacked protein (Hubby's issue).

IMG_9989

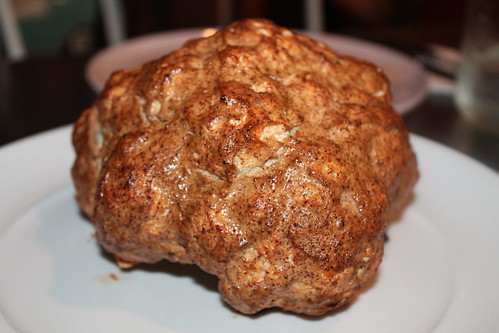
I think the problem with this recipe is that the end result picture looks a lot like a Thanksgiving turkey.  

DELICIOUS.

Remember the old saying, "Don't judge a book by it's cover"?  This recipe is proof that it goes both ways.  Everything that looks good on the outside isn't as great as it seems on the inside.

IMG_9953

I'm going to tell you where this recipe goes wrong. 

IMG_9954

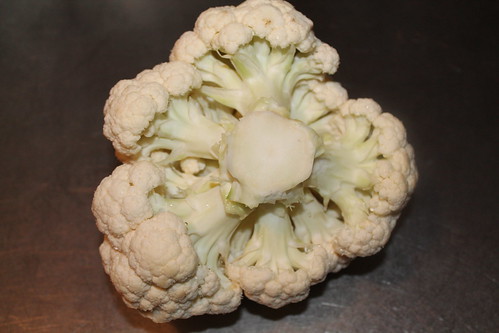
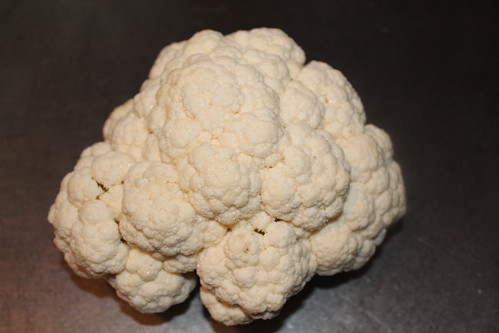
You can't really go wrong with cauliflower.  You either like it or you don't.  Ordinarily, I don't.

But that is not what made this recipe fail, not was it the reason I disliked it.

I have loved experimenting with grilling, ricing, and mashing cauliflower.  My favorite so far has been to put chunks of cauliflower into a food processor and get it to a rice-like state.  After that I put it in the oven on 350 for about 10-15 minutes and it is good to go.  While there is certainly an obvious difference from it and the real thing, on nights where I'm trying to cut back or simply go healthier it works.      

IMG_9957

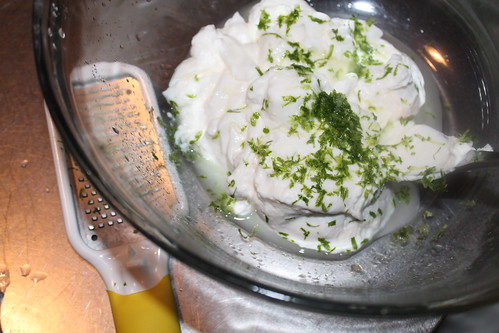
I used up the remainder of my Greek yogurt on this recipe.  That made me a little sad.

IMG_9962

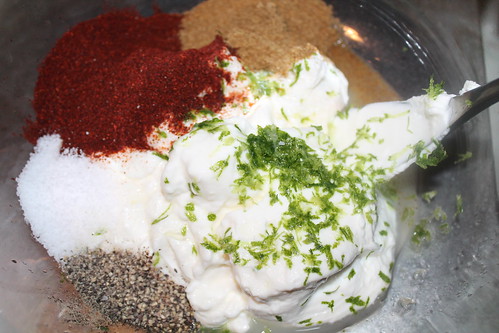
We start this recipe towards disaster by mixing Greek yogurt, lime zest, lime juice, and just about every spicy spice available (chile powder, cumin, garlic powder, curry powder, pepper).  

Alright, perhaps there are some spicier ones out there.

IMG_9963

At this point I already knew the fate of this recipe, but I wanted to believe in it so badly that I ignored my gut.

Even if I had listened to my gut, I would have followed the recipe out to the bitter end.

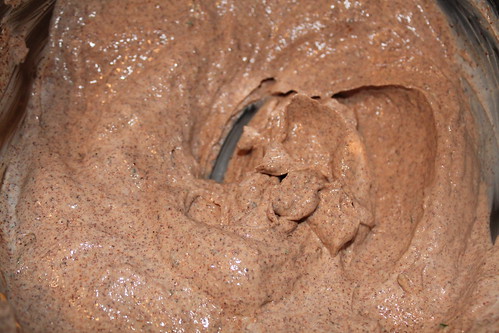
Yet, I continued to tell myself that the odd combined smell didn't matter.  This recipe was going to be delicious.

IMG_9968

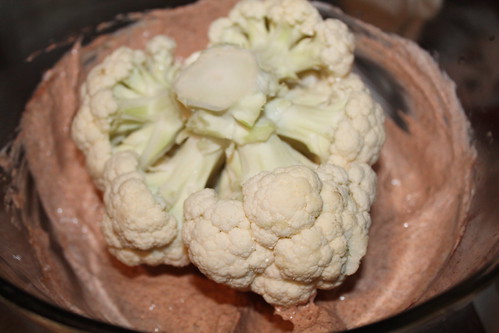
This part was a little fun.  The head of cauliflower is dunked into the yogurt mixture and swirled around until completely covered.  Naturally this required that I eventually use my hands.  By the time the cauliflower ended up on the baking sheet it and I were equally as covered in spicy yogurt.

IMG_9969

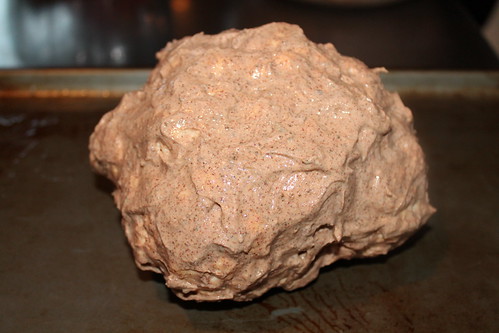
Since the cauliflower needed to bake for 30 to 40 minutes, I assume something scientifically magical was going to happen with the molecular make up of the spices and the yogurt.  Somehow it was going to transform this strange smelling cauliflower head into the roasted cauliflower that I imagined tasted like Thanksgiving turkey.

Foolish, foolish girl, I know.

IMG_9989

As I pulled the finished product out of the oven, the never changing smell of cumin still hung prominently in the air, almost like a public service announcement warning me that my gut had been right.

IMG_9991

Let me reiterate.  It was not the cauliflower's fault. 

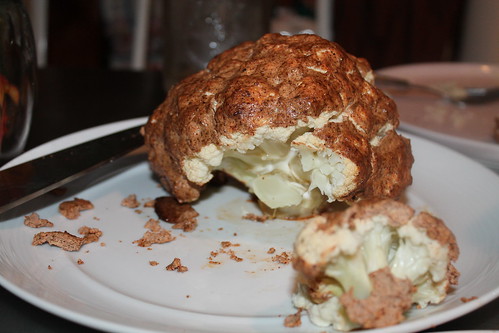
Notice the brown chunks to the left of the plate?  That is what happened to the yogurt mixture.  I have no food relation that I can think to make for it.  It was like a paste that had become dried out.  Was it spicy?  Yes.  I'm not an overly excited fan of spicy food, because I usually can't handle it without needing a gallon of water.  However, I certainly know what good spicy food tastes like.  

This isn't it.

I'm tempted to experiment with this recipe some more.  The promise of an actually delicious roasted cauliflower head I believe does exist, it just will never involve yogurt and cumin.

Wednesday, September 24, 2014

Whole-Wheat Spaghetti and Meatballs

Recipe: Whole-Wheat Spaghetti and Meatballs
Time: 30 minutes 
Ease: 4* 
Taste: -1
Leftover Value: So horrible that the leftovers were tossed.
Down the Drain or Keep in the Strainer: Down the Drain!

*Required more steps that my usual meatballs

IMG_9946

I should have had this recipe figured out at "whole-wheat".  Yet still I decided to make it.

After telling myself again and again that I'm going to get back on track with eating healthier and working out more, I finally had enough.  

I discovered* the blog, 100 Days of Real Foodand was intrigued.  

*This is not ordinarily my type of blog to follow.  I love butter.  I love white flour.  I hate whole-wheat and I hate making limitations on what I eat.  One of my Facebook friends must have liked this page thus bringing it into my feed and drawing my attention to it at a time when I was most vulnerable to wanting to eat healthy.  Darn you, Facebook!

Essentially, the blogger and her family have eliminated highly processed foods from their diet.  That sounds like a good thing, right?  While that is something I'm attempting to do as well, they take it further than highly processed foods such as Oreos and Snickers bars.  They do not eat anything made with white flour or white rice. and only use natural sweeteners (so no white sugar).*

I'm sorry, the thought of that makes me die inside a little.

*I realize these items are processed, however, what the blogger even states in her book is that almost everything we eat is "processed" in some way.  The point is eliminating items that have either absolutely no nutritional value or items that have added ingredients that are not actually food.

There are some aspects of their focus that I agree with and hope to bring into my own eating habits, but some seem a little over the top.

Such as whole-wheat meatballs.

I don't even have an excuse as to why I thought these would be better than the already delicious meatballs that I currently make.*  I'm easily swayed into believing that something is delicious simply because someone else says it is.  I should have known better when I saw carrot bits and soy sauce in the ingredient list.

*These are meatballs that are bite-sized, not overly breaded, tender, filled with the flavors of Italy, and cause people to drop what they are doing and come over to my home when they hear that they're being served for dinner.  I think I need to post them soon.

I went one step better than the recipe and didn't even serve the meatballs with whole-wheat noodles.  I served them with spaghetti squash instead.  I figured I had the healthiest meatball possible and I would cut down on calories with the squash.

The squash was the only thing Hubby and I ended up eating that night.  The meatballs were that bad.  I used 90% lean ground beef, which is what I usually use in my meatballs.  The flavor was so horrible that the meat didn't taste like ground beef (and no, the meat had not gone bad).  Worse than the flavor of the meatballs was the texture.  Rather than a crumbly meaty bite, the meatballs were chewy.

IMG_9949

Chewy meatballs?  I mean, chewy meatballs!  It was like having a meat flavored bouncy ball in my mouth.  I wasn't sure what sorcery had caused this to happen.  Ordinarily I will eat through a horrible meal until I've at least eaten half of what I put on my plate.  With these I couldn't bare to eat more than three quarters of one meatball.

These meatballs had me so upset I almost didn't blog about them.  With new recipes (that I expect to enjoy) I've recently taken to making them the first time without taking any pictures.  My intent is be able to enjoy to process of making them.  Then the next time I can photograph the steps along the way and blog later about the deliciousness.  When I discovered how horrible these were, I snapped a few pictures knowing that I would never, ever make them again.

There is, however, a small glimmer of light at the end of the tunnel.  I made a delicious homemade sauce to go with the meatballs from my old man crush Stanley Tucci's cookbook.  I also tried out a few other recipes from 100 Days of Real Food and found the results to be far better than the meatballs.  So there is hope.

Thursday, September 18, 2014

Homemade Almond Milk

Recipe: Basic Nut Milk
Source: Bon Appetit
Time: 12+ hrs inactive time, 15 minutes active
Ease: 2
Taste: 8
Leftover Value: 10
Down the Drain or Keep in the Strainer: Keep it in the Strainer! 

Milk has never been my friend.  Our relationship dates back to my grade school years when my mother would force me to drink a lidded Tupperware cup (the tall one) filled with white milk on the drive to school.  We were always early, so if it wasn't finished by the time we reached school I was forced to stay in the car sipping instead of playing outside with the other early students.

There is a lot being said about milk these days.  

'Go organic!' 

'Go for the fats!  Drink whole milk!'

'Don't drink real milk at all.  Go soy, go almond!'

Frankly, I could care less about any of these stands.  It was a mixture of seeing the article in Bon Appetit magazine and a friend who cannot drink milk suggesting that I try using almond milk if I wanted to cook something for him involving milk as an ingredient.

The article I read was incredibly comprehensive, it explained so much that I felt confident I would be able to make the best almond milk ever.

The list of ingredients and limited number of steps is what really got me though.

IMG_9851

Almonds, salt, agave syrup...done.

The only problem with making your own almond milk is that it takes a massive amount of waiting.  If you want almond milk immediately, you'll have to go to the supermarket and buy it.

IMG_9862

Take a cup of almonds.*

*Note: You can also use hazelnuts, pistachios, pecans, walnuts, cashews, or peanuts.  I'm interested in pistachio milk...it sounds amazing.

IMG_9866

Place the almonds in a bowl and cover with about 2" of water.

IMG_9869

In order for the milk to be less gritty and more silky the almonds need to soak at least 12 hours.  I didn't plan my time properly, so mine soaked for 20 hours.  

Just look at the difference in the clarity of the water...

IMG_9870

Here is an important point that you absolutely do not want to miss.  This liquid should be drained and discarded.

No one wants to drink almond milk made of musty soaking liquid.

IMG_9873

Put the soaked almonds in a blender with the salt, agave, and four cups of very hot water.

IMG_9875

Hubby and I bought a Ninja last Christmas because it seemed like a great deal and a major necessity at the time.  It sat on top of our fridge, in the original box, until this month.  

I guess it would have been worse if we waited until after this Christmas to open it.

IMG_9879

As life would have it, I've used my blender at least five times in the past week.

I'm not sure if my water was too hot, because during the two minutes of blending it frothed a little.

IMG_9882

The recipe suggests using a fine mesh sieve to strain the nut remnants.  I don't know where my brain was, but the above picture seemed to me like the proper amount of remains to have after blending a cup of nuts.

It wasn't until I cooled the milk and went to transfer it into a carafe that I found at least another half cup of this nut pulp scattered at the bottom of the bowl.  My suggestion, and what I plan to try next time, is to use a cheese cloth or paper towels to catch the nut pulp and drain the milk into the bowl.  It works for coffee grinds when I make iced coffee so I can only imagine it will be the perfect solution to this problem.

IMG_9887

No matter how much you strain, the recipe states, some of the nut pulp will settle at the bottom.  If you've ever purchased almond milk at the supermarket and thought you detected a piece of a nut among the smoothness of your drink--this is why.

IMG_9891

I found the texture of the milk to be similar to one percent milk.  The hint of almond flavor was not overpowering, in fact I found it to be refreshing.*

*And I never, ever, find milk to be refreshing.

The major point and purpose of my making almond milk was to see if it changed the flavor when used in a recipe originally calling for milk.

That night, I made Whole-Wheat Macaroni and Cheese* and loved it!  There was no noticeable difference from if I had used regular milk and even though I knew the secret to the milk I had used I could not detect even a hint of an almond flavor, and neither could Hubby.

*The quest for the perfect mac and cheese continues.  Hubby did not like this one--at all.  I used a sharp cheddar and sort of kind of forgot that he prefers a mild one.  I'll be trying it again, keep your fingers crossed for me.**

IMG_9897

**And yes, we mix hot dogs into our mac and cheese like we are five-year-olds.  I don't care what the world says about hot dogs, I'm going to continue loving them anyway.

I also used the almond milk in hot chocolate.  I know it isn't quite hot chocolate season, but to celebrate the cool feel of fall I thought, why not?  

IMG_9916

Using almond milk in hot chocolate definitely exposes the nutty flavor more than in macaroni and cheese.  As I sipped, it reminded me of a Ferrero Rocher.  If you enjoy those chocolatey delights, then you should enjoy almond milk hot chocolate.

The almond milk was an overall success.  If you can find almonds at a cheaper price--wholesale perhaps?--it is far more worth it than picking up a container at the supermarket.  

Tuesday, September 16, 2014

Blasé Mac and Cheese

Recipe: Alton Brown's Baked Macaroni and Cheese
Time: 1 hr 5 min*
Ease: 2
Taste: 4
Leftover Value: 4
Down the Drain or Keep in the Strainer: Down the Drain

*Needs additional resting time at the end

I am always on the hunt for the perfect mac and cheese recipe.  I should probably just stop while I'm ahead.  I have two perfectly good recipes that I use, one which Hubby likes, the other which he does not.

IMG_8910

I've been making Slow-Cooker Mac and Cheese since we were first married.  It is, as with most things in the slow-cooker, insanely easy and incredibly delicious.  My family loves it, I love it, but Hubby is not impressed with it.

Then I discovered Healthy Mac and Cheese and he fell in love.  Nothing else can measure up to it now.

Though I love Healthy Mac and Cheese it requires a decent amount of active work, and I much prefer a mac and cheese that everything can be tossed into the pot and left to melt together into cheesy goodness.*

Only to drive myself crazy, I continue to experiment with different mac and cheese recipes.  I expected this recipe to be amazing because it was not only by one of the Food Network's famous chefs, but it was also listed as the most popular Food Network recipe of all time.  Of course, this was based on page views on foodnetwork.com and perhaps the viewers who actually made the recipe all had the same experience as me.

Or perhaps not.  We'll never know.

*That rarely happens with any mac and cheese recipe, save for boxed mac and cheese.

IMG_8906

The major plus with this recipe was that the directions were easy to follow.  If you know anything about me by now, I followed them exactly.  My first issue was when it called for stirring in the cheese.  Most mac and cheese recipes will explain to let the cheese melt to a certain point of smoothness, this one did not.  So I let it warm and melt a little, but didn't wait until it was bubbling with cheesy gooeyness.

If it doesn't tell me to do it, I assume I don't need to waste the time.  In this case, it didn't seem to make a difference.

My last issue was the resting time for the dish.  After the macaroni is pulled from the oven the recipe states it should rest for five minutes.  I'm going to admit, the resting time is usually something that I fault on.  Instead of letting my meat rest before slicing, I dig right in.  Instead of letting bread cool to a temperature that will not burn human hands, I brace myself for burns and begin cutting.  Perhaps it is a patience issue, but I think it might really be a food/hunger issue.  However---this time, I waited the five minutes to let the mac and cheese 'rest'.

But this still happened:

IMG_8917

I'm pretty sure that there shouldn't be a lake in the dish after I scoop out a serving.  When I went back about twenty minutes later to give the mac and cheese a second try, it scooped out much cleaner.  That said, if you plan to attempt this recipe, let it rest longer.  It not only prevents cheese floods in your dish, but it also provides a better texture to the noodles.

Ultimately, no matter how long this dish sat it wouldn't compensate for the overpowering onion flavor and crunch of onions throughout.  I thought it was odd that the onions were added at the same time as the milk, typically they are fried alone so that they will soften before other ingredients are added.

The bread crumb topping was unnecessary additional calories.  While I love to use panko breadcrumbs in many different dishes, mixed with butter and sprinkled on top of oniony mac and cheese is simply a waste. 

IMG_8913

Looks like my search for perfectly fabulous mac and cheese has yet to find an end.


Friday, September 12, 2014

Peanut Butter Granola Bars

Recipe: Peanut Butter Granola Bars
Source: http://www.foodnetwork.com/recipes/giada-de-laurentiis/peanut-butter-granola-bars-recipe.html
Time: 1 hr 30 min (15-25 minutes prep time, depending if you need to toast your almonds or not)
Ease: 4
Taste: 6
Leftover Value: 8
Down the Drain or Keep in the Strainer: Keep it in the Strainer!

IMG_8207

I'm always interested in discovering if there is a way I can make at home something I usually purchase prepackaged.  The whole craze over the massive consumption of preservatives in most American diets doesn't help much either.  It does kind of irk me that something like a granola bar, that you think you are being healthy by eating, could have some of the same bad for you things in it as Twinkies.

IMG_8170

However, on the other side of the fence there is the issue of cost.  I refuse to make my own free standing granola because I've found that unless you plan on chomping on the same five-pound bag of granola for the next month, it is something that is simply more cost effective to purchase prepackaged.

IMG_8178

Nuts are stinking* expensive!  And naturally, they are one of the items higher on the list of things you should eat.

*Sorry to use such foul words.  But I speak the truth.

IMG_8177

These peanut butter granola bars were fairly inexpensive to make.  The slivered almonds were the priciest item, however, I already had them on hand so it worked out for me.  The almonds are supposed to be toasted.  I have a hunch the entire recipe wouldn't have crumbled to pieces if they had not been toasted.  Of course, rule follower that I am, I toasted mine.  The almonds were well toasted by five minutes, unlike the eight to ten minute time the recipe gives.

IMG_8182

Instead of old fashioned oats, I used one minute oats--and here's why: price.  This might have created a texture difference in the final result of the bars, I'd have to try it out with old fashion oats to know for sure.  While they were able to be cut up easily, they didn't have that stiff quality that an ordinary granola bar has.

Oh, and I added extra chocolate chips.

I couldn't resist.

IMG_8209

Something odd I noticed, and this might just be me, was that the peanut butter flavor was overpowering on the day I made the bars.  The same was not true the following day.  The flavor seemed to have mellowed out and blended better with the other ingredients the longer they sat.

IMG_8201

As a homemade alternative to the basic store bought granola bar, I'd say these are a keeper.  My favorite part was that they didn't require too much work.  With the exception of toasting the almonds, the process was basically three steps: 1. Mix everything together, 2. Bake, 3. Cool.

When I'm making something that I know is going to be on the healthier side, therefore not something that I'm going to eat and become giddy with a sugar high, I find that easy is best.  If it's easy to do and the taste is better than cardboard, chances are I'll try it again.

Wednesday, September 10, 2014

The Necessity of the Birthday Cupcake

In honor of my birthday, I decided it was time for a post that I have had stored up my sleeve for some time now.  Yesterday, on my other blog, Go Somewhere That's Green, I wrote about teaching and other school related musings.  One item I failed to mention, because goodness gracious I have such a love/hate relationship with it, was birthdays.  Being a September baby, I grew used to teachers never celebrating my birthday or realizing at the end of the day that they had forgotten it.  Even in high school it is a big deal to have your birthday celebrated.  So when in October that one elective teacher decides to be cute and start doing something special for her students' birthdays, the poor September baby rolls her eyes and carries on.  

Of course, in elementary school I helped them remember by bringing in cupcakes.      

20130613_124220

Ah, cupcakes.  The instant smile bringer in any classroom.

20130913_13032020130920_122001

At the mention of cupcakes, students who previously had their heads attached to their desks perk up, suddenly seemingly interested in everything happening in the classroom.  Eyes wander from the window to the door, hoping to be the first one to see the delivery of the promised cupcakes.

20130409_124121

The mood of the room has automatically shifted from students unable to learn due to afternoon tiredness to students unable to learn due to eagerness at the promise of sugar and freedom from their studies.

20131218_12023720130918_114946

Cupcakes are a terribly wonderfully tragic part of a teacher's life.

20130919_131229

For starters, the birthday student has been unable to contain their excitement for their birthday for at least the entire week preceding their birthday.*  I've had students in the past who reminded me every single day of their birthday month that their birthday was coming up--at the very end of the month.

*This may be more significant with younger students, however, I've known my share of middle and high schoolers who have gone berserk over their birthdays.

20131022_15213820131031_152133

Then that student eventually gets some of the more excitable students to get on board the crazy train for their birthday.  If you are in a classroom where an anything but basic calendar is used, naturally, birthdays are marked on the calendar.  For all to see.  So by the day of the student's birthday, the class is a wreck with excitement over the celebration and...of course, the cupcakes.  

20131211_143159

I have a difficult time refusing cupcakes from students.  Let's be honest, I have a difficult time refusing cupcakes from anyone.  Especially if the cupcake has that look of perfection that practically screams out, "I taste delicious!" 

20130607_12140020130606_114831

But I have a particularly difficult time refusing a cupcake from a student on their birthday.  It's even harder when they aren't one of my students.  I'm sure you've heard of the door to door cupcake student.  The one who desperately wants to get out of class on their birthday so they use their leftover cupcakes as a guise for why they need to leave the classroom.

And ten hands go up around the room of students who are suddenly their best friend and want to 'help' them deliver. 

20130524_122011

Yes, this is one of the parts of teaching that I will love to hate to miss.  There will be moments when I'll miss the delight of surprise treats, then moments when my thighs will scream out thanks for being able to fit into my skinny jeans comfortably again.

20130502_11472720130415_134445

Ultimately, I do truly love the birthday cupcake.  They are that momentary way a student, or anyone, can share their special day with others.  They are a silent, "Here's to me!" that can be easily passed out, and eagerly accepted by all.    

20130408_111401

If only I could give you all a cupcake today.