Showing posts with label Thanksgiving breakfast. Show all posts

Friday, December 5, 2014

Recipe #29, #30, #31: Scones, Pie, and Rolls

Recipe: Maple Pecan Scones
Source: The Pioneer Woman Cooks
Time: 1 hr 15 min
Ease: 6
Taste: 7
Leftover Value: 10
Down the Drain or Keep in the Strainer: Keep in the Strainer!

Recipe: Flat Apple Pie
Source: The Pioneer Woman Cooks
Time: 1 hour (does not include time to make pie crust)
Ease: 4
Taste: 5
Leftover Value: 2
Down the Drain or Keep in the Strainer: Down the Drain!

Recipe: Cinnamon Rolls
Source: The Pioneer Woman Cooks
Time: 2 hrs 30 min
Ease: 10
Taste: 10
Leftover Value: 10
Down the Drain or Keep in the Strainer: Keep in the Strainer!

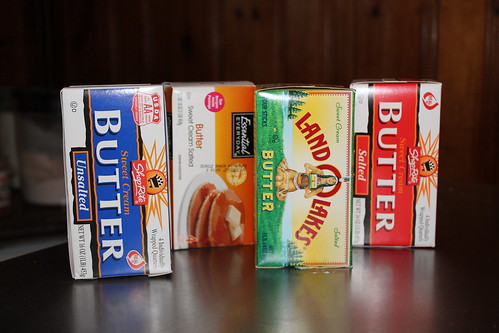
The following three recipes were made along with about ten other recipes for my Thanksgiving breakfast.  If you're just reading this blog for the first time, you may require an explanation for why our breakfast is comprised of dessert items.  This post or this post should help to explain the madness.

Scones baffle me.  Anytime I make them they seem that they will be a complete flop and yet in the end somehow wind up coming together beautifully.

IMG_1225

Between cutting up the dough for the scones and rolling out dough for four different pies, my arms certainly got a workout!

IMG_1227

The dough of scones is supposed to be stirred until "just combined".

Boy, do I hate that description.  What exactly does 'just combined' mean?  And where is the logic in stirring until 'just combined' when the next step is going to direct me to dump this mass out onto my cutting board only to combine it completely.

Thank goodness I had my favorite helper with me so that I didn't meditate on such nonsense for too long.

IMG_1229

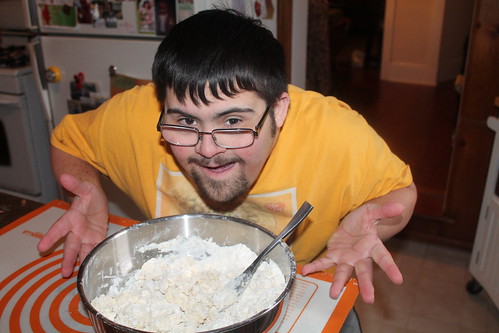
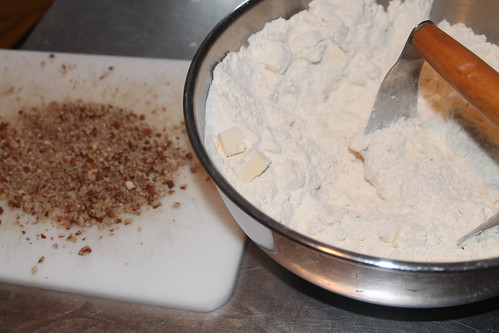
Watch and you'll see what I mean about the craziness that is scone.  The bowl of 'just combined' ingredients when dumped on the table couldn't look less combined.

This is the point where I cringe and begin to convince myself that I will be dumping my scone dough into the trash.

IMG_1231

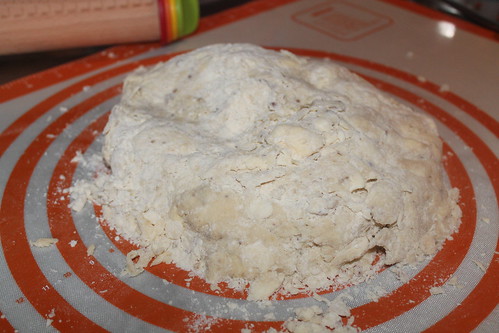
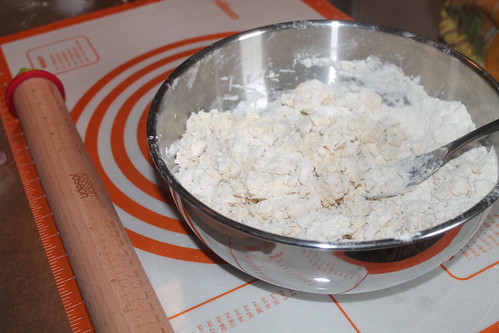
Then magically, this happens:

IMG_1235

and suddenly all is right with the world.

I do realize that it has something to do with the chunks of cold butter that are cut into the dough.  Perhaps what I have difficulty understanding is how anyone ever decided to make a pastry this way.

Not that I'm really complaining. 

Because scones are awesome.

IMG_1238

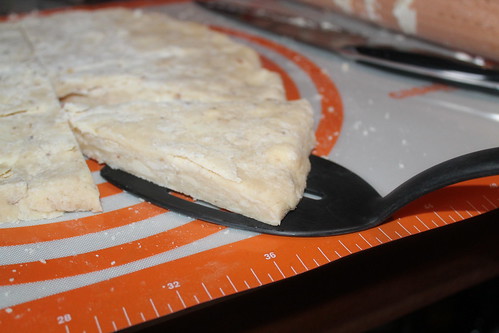
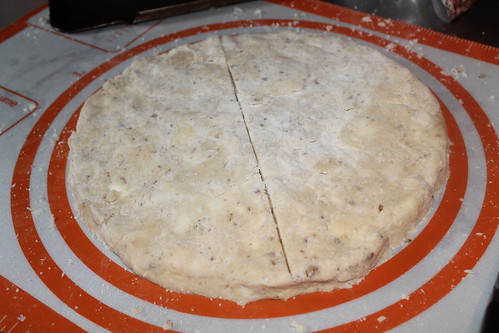
One complaint, which I realized as I pressed the dough to size, was that the scones were going to be monster huge.  I didn't want to stray away from the recipe's directions, so even though it would have been better for my breakfast to have them at half the size, I cut them into the eight pieces as PW instructs.*

*I did, however, break them up into quarters after Thanksgiving breakfast.

IMG_1249

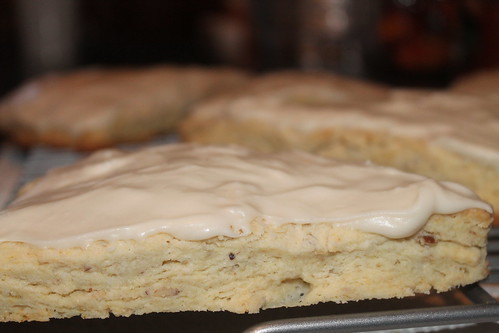
You can't tell from the picture, but these puppies are as big as my hand.

A scone is no good without icing, at least that's my theory.  Here is where the maple part comes in.  The icing is made or powdered sugar, whole milk, butter, a splash of coffee, a dash of salt, and a little maple extract.*

*I couldn't find maple extract anywhere so I used maple syrup--same thing, right?

IMG_1250

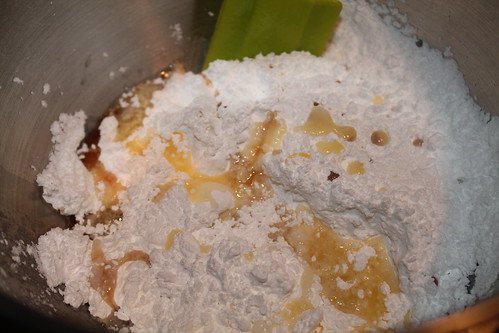
It seemed like too much icing at first, but then I came to my senses and realized that you can never have too much icing.

IMG_1254

It worked out nicely that three of the recipes I needed to make for my recipe challenge would fit perfectly with my Thanksgiving breakfast.

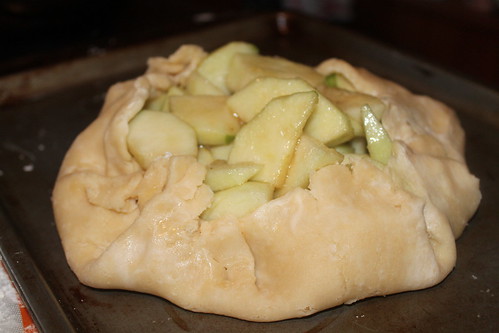
Pioneer Woman's Flat Apple Pie is such a great idea, but in the end, I'm not so sure it works.

At least for those of us who bake our pies the day ahead.

IMG_1219

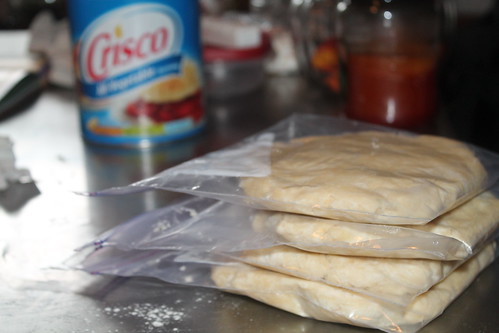
I used the same crust that I made for PW's chicken pot pie.  This made life pretty easy because I could just grab the crusts out of the freezer, let them thaw for 20 minutes, and then use them.

Although I wasn't in love with the final product of this recipe, I was in love with this:

IMG_1289

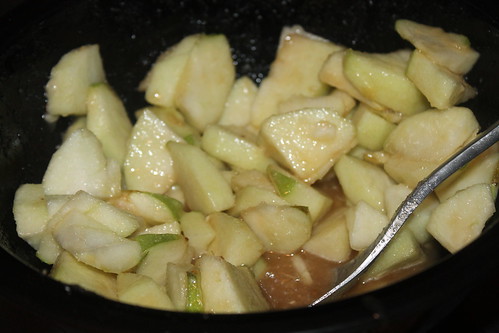
The apple filling mixture was so delicious that my helpers and I could have eaten the entire bowl and skipped the whole pie part.  I equate it to caramel apples, just without all the stickiness.

Again, I think this is such a fantastic idea.  It makes life easy, and each pie requires only one pie crust.

IMG_1288

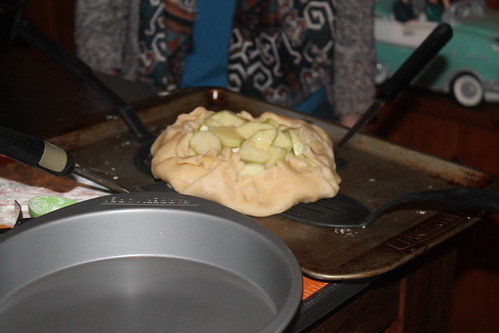
We did run into an issue when I realized that I only had one cookie tray left to bake on (because, naturally we were baking other things at the same time).

So four spatulas were used to lift the pie and place it in a pie pan so that the second flat apple pie could be made on top of the cookie tray.*

*Note: The recipe makes two apple pies.  This is important because if you only want one and you peel and slice five apples, you will probably be upset.  Peeling and slicing apples is no joke.  Unless of course you own one of those fancy shmancy apple peeler/corers.  Then I'm sure life is awesome for you. 

IMG_1294

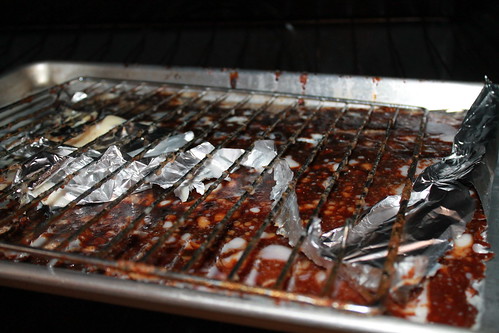
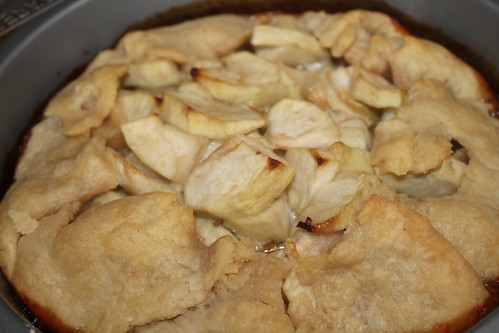
Here is where the problem occurred.  Though the apple mixture was delicious, it was also messy.  With both pies I made, the mixture oozed out of the crust and onto the pan.  This made cutting and scooping the pie quite difficult, especially for the pie that we saved to eat on Thanksgiving morning.*

*The pie baked on the cookie tray basically crumbled apart when I tried to move it from the tray.  This was partially due to the stickiness of the insides that had spilled out onto the tray and partially due to the flaky crust.

IMG_1308


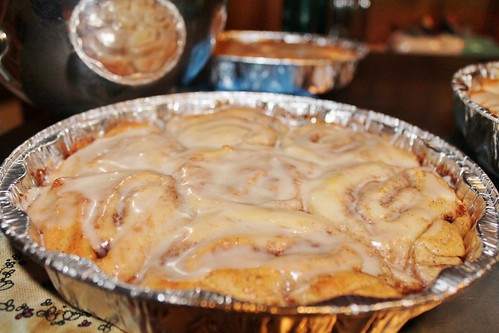
I've saved the very best for last.  These cinnamon rolls are out of this world--but they are incredibly hard work.  My sister-in-law usually comes over to make these with me and we have it down to a science.

I've already blogged about these before so if you'd like to read about the process go here.

Or, just stare and drool at the below picture.

IMG_6664

Friday, December 6, 2013

Thanksgiving Delights: Part Four, Cinnamon Rolls

Recipe: Cinnamon Rolls
Source: The Pioneer Woman
Time: 3 hours
Ease: 10
Taste: 10
Leftover Value: 10
Down the Drain or Keep it in the Strainer: Keep it in the Strainer!

I've saved the piece de resistance for last.

Every single time I make these, something seemingly terrible happens and I fear the worst.

Something like, I double the batch instead of halving it.  Or, I forget to let the buns rise before shoving them into the oven.

You do things like this too, right?  Please say you do.

But in the end, they always come out looking like this:

IMG_6661


and all my fears subside.

Before I carry on, I want to take this moment to mention the star of my Thanksgiving breakfast:

IMG_6640


Dear dear butter.  How could we exist without the goodness you add to cakes and pastries?

I'm sure my thighs could still exist, but my heart would have an empty butter shaped hole.

Alright, enough of the sentimental stuff.

These cinnamon buns start out friendly.  The first steps require combining a warm liquid mixture with yeast.  Then, mixing it all together with flour.

A lot of flour.

Hence why I desired to cut the recipe in half a few years ago to no avail.

The dough sits for an hour.  I spend this hour trying to throw together one of my easier Thanksgiving breakfast recipes.  This year I spent this time making the Mini Cherry Pecan Pie 'dough'.

IMG_6657


I always use this pot and I'm always annoyed when after an hour is up I realize I meant to use my larger pot.

The moral of this story is: use a large pot.  And of course, don't be like me.

After the hour, baking powder, baking soda, and salt are sprinkled on top of the mixture.  They are then mixed into the dough along with another cup of flour.*

*Note: You will more than likely need to add even more flour.  I always knead the dough and then think, "Gee, this seems a little moist but I think it will work" and then I'm filled with regret later.

Because the step that follows is going to make your cinnamon rolls even more moist, gooey, and messy.  It's what takes this recipe from fun and friendly to painful agony.

Okay, I'm a little dramatic.  It isn't quite that bad.

IMG_6658


What you're looking at, dear friends, is what I imagine the entryway of heaven must look like.  Golden and delicious.

Alright, I'm not sure about the delicious part, but a girl can dream, can't she?

Because in the recipe she says you can use even more butter for the filling, I use exactly how much the recipe states (because even that seems a bit excessive considering the looks of the above picture).  This is followed by covering the butter with cinnamon and sugar.  The dough is then rolled towards you into one long luscious log of liberty.*

*This makes sense, I promise.

Because I like to give you the cold hard truth here about the recipes I try out, I am going to tell you the mixture of issues I always have at this step.  First of all, my cinnamon rolls always end up oozing buttery pools mixed with cinnamon sugar by the end of the roll.  The next problem is the dough isn't firm.  This doesn't create the perfectly formed cinnamon buns you see in all the Pillsbury commercials.  Instead my buns look like Pillsbury blobs.

Yet, once I assemble my blobs into their pans, bake them, and ice them, they always end up looking like this:

IMG_6664

So for all the faults I have encountered in making these gorgeous globs of goodness, I suppose if they always come out tasting delicious, that's all that matters in the end.

Wednesday, December 4, 2013

Thanksgiving Delights: Part Three, Candied Bacon

Recipe: Candied Bacon
Time: Source states 15 minutes, it took me about 25 minutes
Ease: 1
Taste: 8
Leftover Value: No leftovers!
Down the Drain or Keep in the Strainer: Keep it in the Strainer*

*But only for special occasions!


How I have gone this far through life without hearing of candied bacon, I do not know.  

I've heard tell of chocolate bacon.  There is a billboard on the main highway near my home for a candy store about twenty minutes north.  A slab of chocolate bacon is pictured.  The same sign is about ten miles down the road.  I see it so often I can't help but feel that we are on a more than just acquaintances basis.

Yet, I am not sure how I feel about it.

I first heard of candied bacon on the blog: Lunchbox Blues

It looked like such a treat.  I knew I had to try it out.  Since it was candied, I assumed it would fit in perfectly with my dessert breakfast.

I quickly learned that while candied bacon is divine, there are two things you must know before attempting to make it:

1. This may seem obvious, but candied bacon is sweet.  If you are expecting regular bacon, you will not get regular bacon.  You have to prepare yourself for candied bacon.  

2. Making candied bacon can be extremely messy.  Use as much precaution necessary.  J.M.Hirsch, the blog's author, warns the cook that he/she must line a rimmed baking sheet with foil or clean up will be horrendous.  I followed his direction, and even then feared clean up would be a beast.

Despite the below picture, have no fear, the clean up was not as horrible as I feared.

IMG_6711

Candied bacon is as easy as pepper, brown sugar, and bacon.  Literally the simplest recipe on earth.  Sprinkle the bacon with pepper, if you want to add a little smoked paprika you can.  Then, put a cup of brown sugar in a Ziploc bag.  Toss the bacon strips in the sugar, then lay the bacon on a wire rack set over a rimmed baking sheet lined with tin foil.  If you spray everything with cooking spray that will ensure an even easier clean up.* 

*Note: I did not do this.  Don't be like me. 

Since it was Thanksgiving morning, and since my bacon took about 20 minutes to crisp instead of 10 as the recipe states, I didn't have time to clean up the scalding hot grease that sat in my pan.

This meant the above picture occurred over the course of the following four hours.  At first I thought my life was over and pictured myself throwing the entire thing away and having to reason going out and purchasing a new rimmed baking pan.  However, my husband, who I am pretty sure is the smartest living soul on earth, quickly calmed my fears by telling me to throw the pan into a hot oven for a few minutes.  

It worked perfectly and my pan was soon so clean no one would know the disgusting grease that had coated it only hours before.

20131128_095754
Our dessert breakfast table.  Yum!
Though it certainly looks like regular bacon, candied bacon is far from it.  My father was excited when I first gave him a piece, then instantly declared that you should never mess with a good thing like bacon.

I suppose we can't all be a fan.  If I had been in a real bacon mood, I might have been inclined to agree.

Everyone else seemed to like it a lot.  Again it was not what they expected.  So be sure to brace yourself for something different than bacon that is made up almost 100% of bacon.

I think I enjoyed it because I'm one of those people who likes to pour their syrup all over everything on their plate.  It simply adds more flavor to not only pancakes, but bacon and eggs as well.

It also adds some more flavor to my hips, but that's a sad story for another time.

Candied bacon reminded me of the bacon slices that have been sitting on my plate wading in a pool of maple syrup.  Sweet, crisp, and delicious.

IMG_6696

Another perk to making this candied bacon was that I learned making bacon in the oven is just as delicious as frying it in a pan.  I will certainly be giving that a try next time I make bacon sans brown sugar.